How to Successfully Install a New Window: A Complete Step-by-Step Guide
Installing a new window can seem like a daunting task, but with the right tools, materials, and guidance, it can become a manageable and rewarding project. Whether you're replacing an old window or installing a new one in your home, understanding the steps involved is crucial to ensure a successful installation. This comprehensive guide will walk you through each step of the process, providing tips and details to help you complete the job efficiently and correctly.

Before you begin the installation process, it's essential to gather all the necessary tools and materials. Here’s a list of what you’ll need:

- Measuring tape
- Level
- Screwdriver (Phillips and flat-head)
- Hammer
- Utility knife
- Caulk and caulking gun
- Shims
- Wood or vinyl window frame (pre-measured)
- Insulation material (e.g., foam or fiberglass)
- Safety goggles and gloves
The first step in window installation is to measure the existing window opening accurately. Measure both the width and height of the opening from the inside of the house. Be sure to measure at three points: the top, middle, and bottom for width, and left, center, and right for height. This ensures that you get the correct dimensions for your new window.
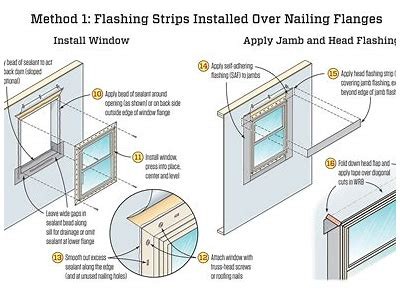
Once you have your measurements, it's time to remove the old window. Begin by taking off any interior trim or molding carefully, particularly if you plan to reuse it. Next, remove the sashes and any fasteners securing the window frame to the wall. This can involve removing screws or nails, so be prepared to use your utility knife to cut through any caulking that may be holding it in place.

With the old window removed, clean the opening thoroughly. Inspect the area for any signs of damage or rot that may need repair before installation. Ensure that the rough opening is square and even; if needed, use shims to correct any unevenness. This is an essential step to ensure that your new window fits securely.

Place the new window into the opening, ensuring it is centered and level. It may be helpful to have a friend assist in this step to hold the window in place. Using shims, adjust the window until it is perfectly level and plumb. Secure it in place by fastening screws through the window frame into the rough opening.
Now, it's time to insulate around the window. Insert insulation material into any gaps between the window frame and the rough opening. This helps to improve energy efficiency and prevents drafts. Step 5: Sealing the Window
After the window is securely installed and insulated, the next step is to seal it properly. Apply a bead of caulk around the exterior perimeter of the window. This will not only help keep water out but will also enhance the overall appearance by creating a neat finish. Step 6: Replacing Trims and Finishing Touches
Once the caulk has set, you can proceed to replace any interior or exterior trims. This might involve reusing the existing trim or installing new trim to match your home’s decor. Paint or stain the trim as needed to complete the look. Conclusion
Congratulations! You've successfully installed a new window. By following these steps and taking your time to ensure each stage is completed correctly, you can enjoy the benefits of improved energy efficiency and aesthetic appeal in your home. Additional Tips
For best results, consider painting or sealing any wooden trim pieces before installation to prevent future issues with moisture. Additionally, always check local building codes to ensure compliance with regulations regarding window installations.
Remember, though the process may seem intimidating at first, careful planning and execution can yield professional-looking results. Happy installing!
-

How to Easily Access Your Willbet Casino Online Account and Secure Login Guide
-

Get Exciting Betting Opportunities with Interwetten €12 Bonus Offer Today
-

Exploring Innovative Mining Techniques and Technologies in the Latest Mines Demo تجربة
-

Comprehensive BetFinal Casino Review: Games, Bonuses, and User Experience Explained
-

How to Successfully Log into Ignition Casino for Real Money Gaming Access
-
How to Successfully Install a New Window: A Complete Step-by-Step Guide